HOW to MAKE a
MAKER FAIR T-SHIRT
in 12 easy steps!
(because we do everything in dozens around here)
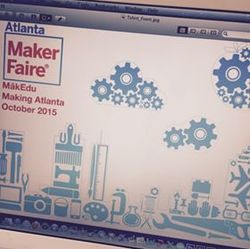
STEP ONE: ART
Create an eye-catching and colorful image that will pique the interest of curious passersby to ask "Maker Faire? What's that?"
Create an eye-catching and colorful image that will pique the interest of curious passersby to ask "Maker Faire? What's that?"

STEP TWO: SEPARATION
In the wide world of screen printing, we print one color at a time.
Now is the time to not make a mistake. No turning back after this! Make a separate piece of film for each color.
In the wide world of screen printing, we print one color at a time.
Now is the time to not make a mistake. No turning back after this! Make a separate piece of film for each color.
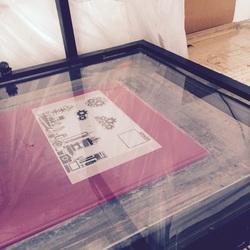
STEP THREE: EXPOSE
The film and the screen are held in place by a vacuum seal under glass on the exposing unit while a 1000 watt metal halide UV-intense bulb works its magic. It's really bright. Don't look at it! Well, you can look at this photo, don't worry.
The film and the screen are held in place by a vacuum seal under glass on the exposing unit while a 1000 watt metal halide UV-intense bulb works its magic. It's really bright. Don't look at it! Well, you can look at this photo, don't worry.
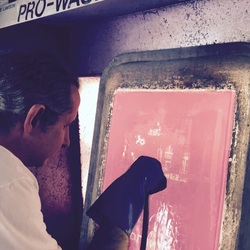
STEP FOUR: WASH OUT
Off to the wash out sink. The water washes away the emulsion in all of the spots where the black image was on the film.
Careful! The sink is backlit, so we have no excuse to make a mistake here.
Off to the wash out sink. The water washes away the emulsion in all of the spots where the black image was on the film.
Careful! The sink is backlit, so we have no excuse to make a mistake here.
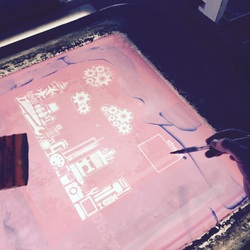
STEP FIVE: BLOCK OUT
After it dries, the screen is placed on a giant light table. With a steady hand, we block out any imperfections. This is the last stop before printing.
When it is ready, the block out needs to dry. Again, more waiting.
After it dries, the screen is placed on a giant light table. With a steady hand, we block out any imperfections. This is the last stop before printing.
When it is ready, the block out needs to dry. Again, more waiting.
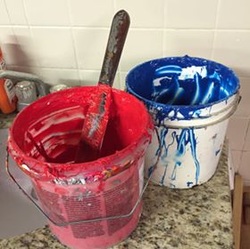
STEP SIX: INK
Time for ink! You already mixed the ink, right? Of course you did!
Official Maker Faire Ts require an extra-special red and a proprietary blue that is known only to the official screenprinters to geeks nationwide... Worldwide Shirts.
Time for ink! You already mixed the ink, right? Of course you did!
Official Maker Faire Ts require an extra-special red and a proprietary blue that is known only to the official screenprinters to geeks nationwide... Worldwide Shirts.
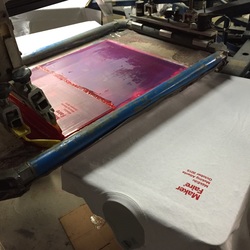
STEP SEVEN: PRINT FIRST COLOR
Screens go up into the press and we print the first color. The first color is the one you print before the second color.
Screens go up into the press and we print the first color. The first color is the one you print before the second color.
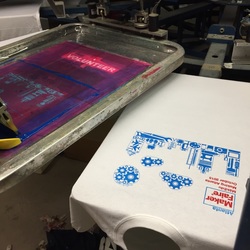
STEP EIGHT: REGISTER SECOND COLOR
The second color is the one you print after the first color.
The second color is the one you print after the first color.
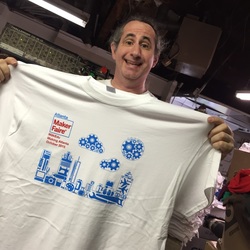
STEP NINE: INSPECT TEST PRINT
Take a close look at the first print. Really close. Really, really close. Do we have to start over from Step 1? Not today, because it looks great!
Take a close look at the first print. Really close. Really, really close. Do we have to start over from Step 1? Not today, because it looks great!
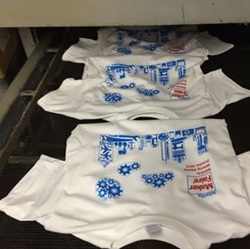
STEP TEN: CURE
Into the dyer they go, one by one. They'll spend 60 seconds slowly running along the conveyor belt, enjoying 365 degrees Fahrenheit of forced hot air. When they come out, the ink is cured.
Into the dyer they go, one by one. They'll spend 60 seconds slowly running along the conveyor belt, enjoying 365 degrees Fahrenheit of forced hot air. When they come out, the ink is cured.
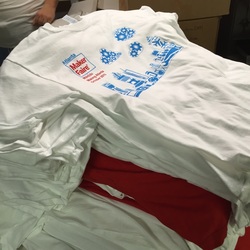
STEP ELEVEN: REPEAT
Keep on going. And going. And going. Adult-sized shirts. Youth-sized shirts. Volunteer shirts. No time for lunch today, guys, sorry.
Keep on going. And going. And going. Adult-sized shirts. Youth-sized shirts. Volunteer shirts. No time for lunch today, guys, sorry.
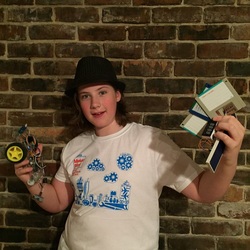
STEP TWELVE: CUSTOMER FEEDBACK
Success!
100% Maker-approved!
Success!
100% Maker-approved!
